Give an AI agent tools
Group the right actions into an MCP toolset.
The agent discovers the allowed tools and can call them.
find_customerREADget_available_slotsREADread_order_statusREADYour path, in three steps.
- 01
Create a toolset
Open Toolsets → New Toolset. Name it after its purpose. Enable Read-Only Server to restrict tools to reads.
- 02
Add relevant actions
Click Attach Connector. Give each tool a specific name and a description of when to use it.
- 03
Configure your agent
Copy the MCP configuration into your client. Save the token shown at creation, then verify a read against a known example.
Want to go deeper?
Open just the topic you need.
What a Toolset is
A Toolset is a named group of connectors behind a single address and a single key, which you hand to an AI assistant. The assistant then sees each connector of the group as one tool it can call: look up the free slots, place a booking, read an invoice. It works with Claude, Cursor, and anything else that speaks the same standard (MCP).
find_customerREADget_available_slotsREADread_order_statusREADBefore you start
- At least one connector. A paused connector is not offered to your assistant until you activate it again.
- A name for the job the assistant does — "Front desk", "Invoicing" — rather than a name built from the sites behind it.
- Something to paste the result into: your assistant's settings page, where custom tools or MCP servers are declared.
Create the Toolset
- 1
Open Toolsets and click New Toolset
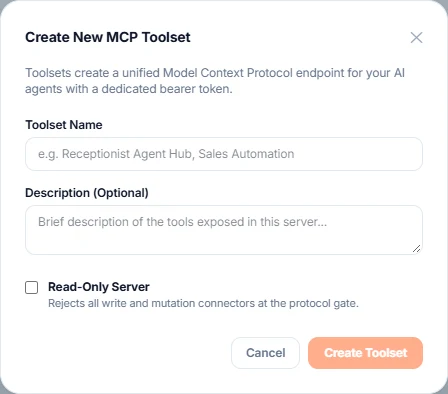
Toolsets is in the left menu. The button opens a window titled Create New MCP Toolset.
- 2
Fill in Toolset Name
This is required — the window will not let you create the Toolset without it. Use the job, for example
Front desk. - 3
Fill in Description (Optional)
One line on what this group is for. It is shown on the Toolset page and helps you tell two similar Toolsets apart later.
- 4
Decide the Read-Only Server box now
Tick Read-Only Server and every connector that changes something is rejected at the gate, before the assistant is even offered it. Tick it whenever the assistant is not one you built and trust. You can see the state later on the Toolset page; treat this as the setting that matters most.
- 5
Click Create Toolset
The window closes and the Toolset appears in the list.
Attach your connectors
- 1
Open the Toolset, then click Attach Connector
The button sits next to Exposed Connector Tools, at the top of the list of tools. A window titled Attach Connector as MCP Tool opens.
- 2
Choose the connector in Select Active Connector
The list only contains connectors the assistant is allowed to see — the active ones, filtered further by the read-only setting. If the connector you want is not in that list, it is not Live, or the Toolset is read-only and the connector changes something.
- 3
Fill in Toolset Name (for Agent Calls)
This is the name the assistant will see, so make it describe the task and the account:
read_slots_example_booking, nottool1. Letters, digits, underscores and hyphens only. - 4
Fill in Tool Description (Instructions for LLM)
One or two sentences telling the assistant when to use this tool and what the values mean. This text is the assistant's only instruction, so be direct.
- 5
Click Attach Tool
The connector appears in Exposed Connector Tools with a READ (GET) or WRITE (POST) tag and the name the assistant will call.
- 6
Repeat for each connector the assistant needs
A Toolset holding a read and an action for the same site is the usual shape: one tool looks things up, the other changes them.
Copy the connection details
- 1
Copy the token when it is shown
When a Toolset is created, and whenever you press Rotate Token, Vela shows the bearer token once, in a window titled Save your MCP Bearer Token. Copy it then: only a fingerprint of it is kept, so it cannot be shown again.
- 2
Paste the setup block into your assistant
The Toolset page gives you the address and the token already arranged the way your assistant expects. Paste that block into the assistant's MCP or custom-tools settings, not the address from your browser's address bar.
- 3
Keep the header word in front of the token
The token must be sent exactly as given, including the word in front of it. Dropped, no token is read at all and every call is refused.
How you know it worked
Your assistant lists the tools of the Toolset by the names you gave them. Calling one returns the same answer a Run Live Test returns on the connector page, and the call appears in the connector's Activity & Logs as an ordinary use.
The read-only switch
Read-Only Server is set when you create the Toolset. Connectors that change something are then hidden from the assistant and refused if it tries anyway, including when it is working from a list it fetched earlier. This is the setting to use for an assistant you did not build yourself — it cannot be talked out of it.
Without it, you are relying on good manners
Vela describes each connector to the assistant as one that only reads, or as one that changes data. Well-behaved assistants ask before using the second kind. That is a warning, not a lock. The read-only switch is the lock.
Changing or removing it
- Rename or re-describe a tool: open the Toolset and edit the name or the description on the connector card. The assistant picks it up the next time it lists the tools.
- Remove a tool: the bin icon on the connector card. The assistant can no longer see or call it.
- Replace the key: Rotate Token on the Toolset page. Copy the new token immediately — the old one stops working at once, so paste the new one into your assistant straight after.
If something goes wrong
- The connector you want is not in Select Active Connector. It is not Live yet, or the Toolset is read-only and this connector changes something. That refusal is the read-only switch doing its job.
- Your assistant sees no tools at all. The address you pasted is probably the one from your browser's address bar rather than the one shown on the Toolset page, or the token is missing the word in front of it.
- A call is refused as if no key was sent. The token was rotated after you pasted it. Paste the new one.
- A tool the assistant used to see has disappeared. The connector behind it is no longer Live, or it was removed from the Toolset.
What it costs
A call by an assistant is a use like any other: it shows up in the connector's history and counts towards your allowance, exactly as if you had called the connector yourself.
Where to go next
- No-code setups (n8n, Make, Zapier, CloseBot, Vapi): Connecting your other tools.
- Your own code talking MCP: The MCP endpoint.
- Nothing works and you need a way out: Troubleshooting.
One server address for the tools in your toolset.
↗Your situation doesn’t match the guide?
Talk to the team ↗