Create your first connector
A URL, a clear goal, then a first result to verify.
A connector verified for your use case, ready to use.
Your path, in three steps.
- 01
Describe the expected result
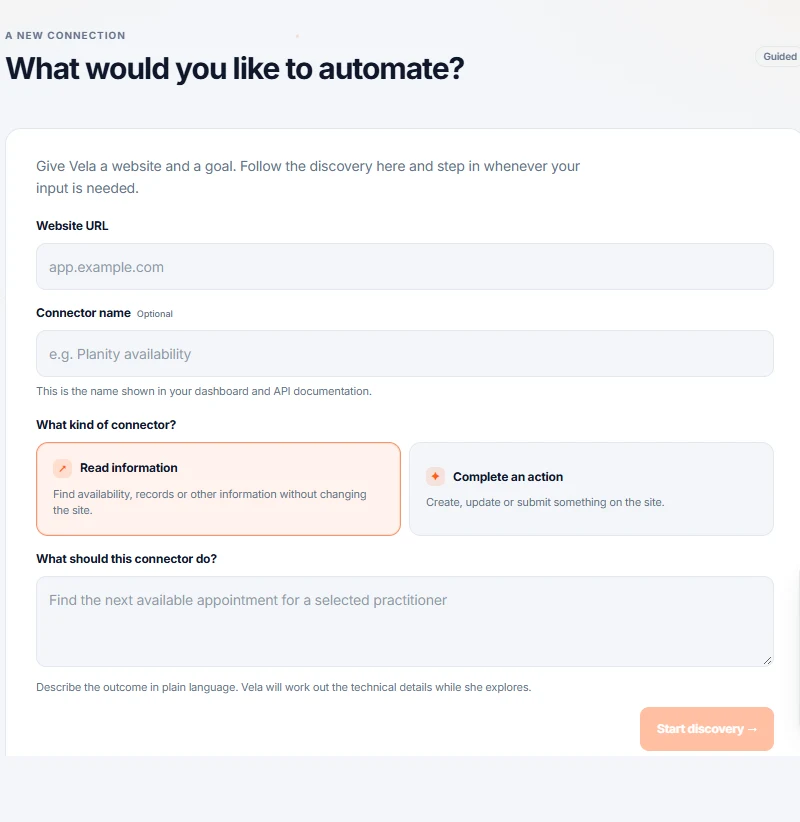
Open New Connector, then Guided. Fill in Website URL and What should this connector do? Choose Read information or Complete an action.
- 02
Follow the discovery
Click Start discovery. Sign in through the browser when Vela asks, and clarify any ambiguous steps.
- 03
Verify a result
Review the inputs and outputs. Open Live Test on the resulting connector and compare its response with your example before integrating it.
Want to go deeper?
Open just the topic you need.
What you are doing
You are creating a connector: one task on one website, ready to be called by your other tools. You perform the task once inside Vela, Vela works out how the site does it underneath, and from then on it can repeat it without a browser.
Before you start
- The exact page where the task happens — not the site's home page. If you book from the calendar screen, that is the address to have ready.
- The login you normally use on that site, including whatever it asks for a second time (an SMS code, an authenticator app, an approval screen).
- One sentence describing the outcome you want, written the way you would explain it to a colleague: "Read the appointment slots for the next two weeks."
- If the task changes something, a test record on that site — a test client, a test slot, a draft invoice. See the warning below.
If your task changes something, it really happens
A connector that books, sends, cancels or submits performs the action for real while you demonstrate it. Use a test record if the site has one. Vela does not repeat it later: checks and repairs replay the recording instead of performing the action again.
Step by step
Everything below happens on the creation screen. You reach it by clicking New Connector — the button in the top bar of Connectors, and the same entry in the left menu.
- 1
Choose how you want to describe the task
Two buttons sit at the top: Guided · Describe your goal and Advanced · Define your fields. Start with Guided — Vela asks you questions and works the fields out with you. Advanced asks you to declare the inputs and outputs yourself, and is the one to pick when you already know them.
- 2
Fill in Target URL
Paste the address of the page where the task happens, for example
https://app.example-booking.test/calendar. This one field matters most: starting on the right page is what lets Vela understand the task instead of hunting for it. - 3
Fill in Connector Name (optional)
A short name you will recognise in a list, for example
Read example-booking slots. Leave it empty and Vela names it for you; you can rename it later. - 4
Fill in Your goal
Describe the outcome in your own words: what goes in, and what comes back. For example: "Given a date, read the free appointment slots for that day."
- 5
Choose the Operation Mode
Read information for a task that only looks things up. Complete an action for a task that changes something on the site — booking, sending, submitting. Choose the second one and the test-record warning above applies.
- 6
Click Start building
The button stays disabled until the address and the goal are filled in, so a grey button means one of those two is still empty.
- 7
Sign in when the browser appears
A browser opens inside the page and hands you the keyboard. Sign in exactly as you normally do — password, code by text, authenticator app, puzzle, whatever the site asks for. Vela notices when you are through.
- 8
Do the task once, on a real example
Perform the task yourself in that browser, on a real record. If two routes exist, take the shorter one — Vela learns the route you take, detours included. It may ask you a question when something is ambiguous; answer it and it carries on.
- 9
Wait for the build, then read Inputs & outputs
The right-hand panel shows Inputs & outputs: what your connector will ask for, and what it will give back. Read it now. If a name is unclear, rename it here — this is what your other tools will see.
- 10
Use the result
When the build finishes you land on the connector page. Open the Live Test tab, fill in the API Playground section and press Run Live Test to try the connector with values you type. The Integrations & Exports tab produces the ready-made setup for n8n, Make, Zapier, your AI assistant, or plain code.
How you know it worked
The connector page shows the connector switched on, an address and a key under Integrations & Exports, and a run recorded in the Activity & Logs tab with a duration and a result. A Run Live Test from the API Playground returns that same result, which is what your other tools will receive.
Read information or complete an action
The Operation Mode you choose decides how Vela treats the connector afterwards. Reading and acting are not the same thing on the site, so they are not the same thing here.
| Read information | Complete an action | |
|---|---|---|
| Does | Gives you information | Changes something on the site |
| Example | Free slots, an invoice, a stock level | Book, send, submit, cancel |
| Automatic check | Vela tries it about once an hour to make sure it still works | Never. A check that books an appointment is not a check. |
| With an AI assistant | Freely usable | Marked as one that changes data, so the assistant is told to ask first |
If something goes wrong
- A field looks wrong in Inputs & outputs. Rename or remove it there — you do not need to rebuild. Do not remove a field the connector actually returns: Vela checks that what comes back matches what you declared, and the next run fails if it does not.
- The build stops on an anti-robot check. Vela tells you. Sites built to fight automation on purpose are out of scope, and starting again will not change that.
- The build stops on a step only some accounts have. Run the demonstration again, stay on the shorter route, and take that step yourself when it appears.
- The result was empty or wrong. The demonstration taught Vela from a search with no results or a made-up value, so it learned nothing about a real answer. Run it again on a record that really exists.
Where to go next
- Use it elsewhere: Connecting your other tools.
- Hand it to an AI assistant: Create a toolset.
- It stopped working one day: Sign a connector back in.
Find the right configuration in Integrations & Exports.
↗Your situation doesn’t match the guide?
Talk to the team ↗